Google “excel vba progress bar” sometime and prepare for a hell paved with good intentions. There are dozens of write-ups, thousands of lines of custom UserForm code and more designs then one person could use in a lifetime.
Save yourself the heartburn and summarily ignore every single piece of UserForm-based progress bar advice that comes your way.
When you’re working on an Excel app that takes a long time or enters a big loop, all you need to do is make sure your user knows that Excel has not frozen. And for that, Application.StatusBar is definitely the right look.
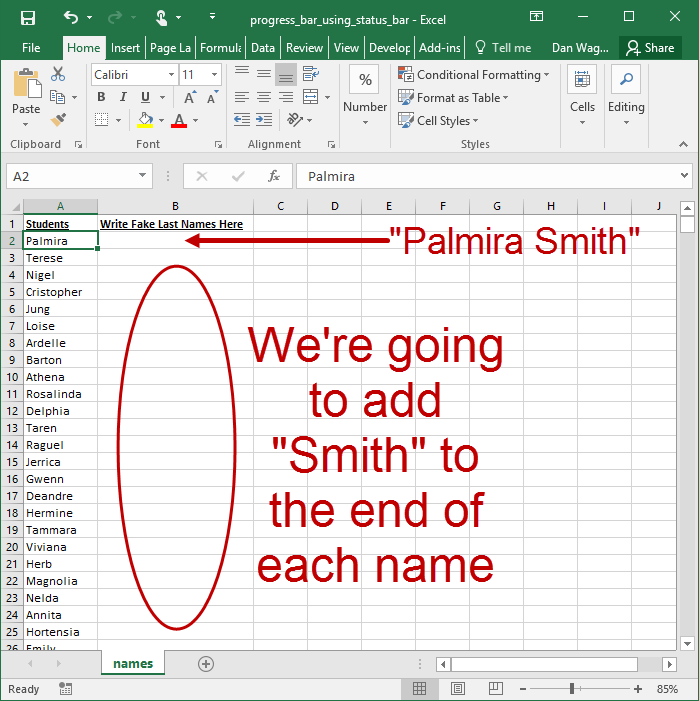
Here’s an example with a big outer loop that appends “Smith” to the end of 1000 first names.
Since all we’re really interested in for this particular example is the “progress bar” aspect, let’s talk about lines 26 through 29 (and eventually line 34).
There are two variables in play here: lngIdx, which is the counter that iterates through the rows, and lngLastRow, which we assigned to be 1001 way up on line 10.
By showing the user an incrementing counter, he or she will be able to clearly see that the script is running. Mission accomplished!
We can add a little sugar to the display with the Format function, which calculates the progress as a ratio (i.e. lngIdx / lngLastRow), then formats the result as a percentage (“0%”).
One last thing — line 34. Before finishing, we want to set the StatusBar back to its default state, which is as easy as setting it to False. Boom!
Here’s a 4-minute review and explanation of Application.StatusBar:
Have you ever genuinely needed to create a progress bar? If so, let me know — I’d love to know more! And if you’d like more step-by-step, no-bullshit VBA guides delivered direct to your inbox, join my email newsletter below.
How do I fill-in sheet 1 with data from sheets 2, 3, 4 … ?
It’s time to combine data y’all
Like Samuel L. Jackson in Jurassic Park, this one’s a classic. You and your team are sharing a single Workbook, with each of you operating on your own Sheet. Once everybody is done, you need to combine the data from each Sheet into a single, continuous Sheet for import into a different program. (Or a final pivot table. Or a report to your manager. Or a what-the-flip-ever …)
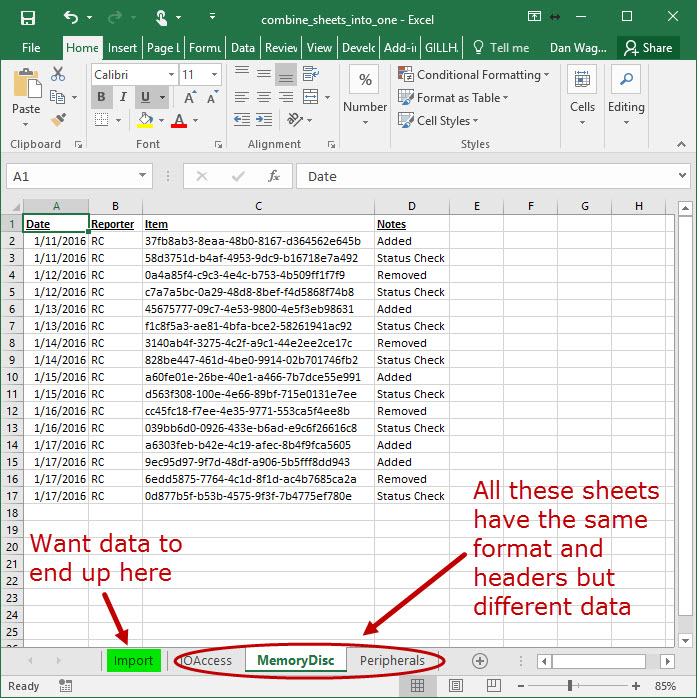
Let’s dissect a real example. Suppose you have a Workbook like this, with data Sheets that have the same headers (but different info on each). You want to combine this data onto the “Import” sheet, which has the exact same headers too.
Step 1 – Setup takes place from lines 11-13, where we make three assignments:
wksDst, the “Import” Worksheet
lngDstLastRow, the last-occupied row on the “Import” Worksheet
lngLastCol, the last-occupied column on the “Import” Worksheet
We know that all the data Worksheets have the same shape, so lngLastCol is going to be the same value for the duration of the script.
(Wondering about the functions LastOccupiedRowNum and LastOccupiedColNum? They’re in the VBA Toolbelt and are also defined on lines 45-87… You will use these functions constantly in Excel, so get used to defining them in your macros!)
The final setup step occurs on line 16, where we assign the initial Destination — this is where our first paste will start.
Next up is Step 2 – Exploration, which occurs inside the loop from lines 19-25. The For Each wksSrc in ThisWorkbook.Worksheets loop iterates through all Worksheets in this Workbook. (LOVE this syntax… so easy to read and understand!)
Line 22 ensures that the “Import” Worksheet is skipped (since that Worksheet is the destination, NOT a source). This phase ends on line 25, where the last occupied row on the source Worksheet is identified — again, leveraging LastOccupiedRowNum from the VBA Toolbelt.
We’re onto Step 3 – Execution! Short and sweet here, from line 28 to 31.
The source Range is assigned on line 29, taking advantage of the last row, lngSrcLastRow, which we figured out on line 25 above, and lngLastCol, which we identified wayyy back up on line 13. Finally, we use the Range.Copy method on line 30 to move the data to the destination Range — smooth!
Lines 34-35 are a quick switch back to Step 2 – Exploration, this time taking place on the destination (“Import”) Worksheet. Since new data has been added (in the Execution step above), we recalculate the last-occupied row, reset the destination range and continue the loop on to the next Worksheet.
That’s it, no Step 4 – Cleanup necessary!
Here’s a 4-minute guide to the code above, with an emphasis on the Exploration and Execution steps:
Combining multiple Sheets into one Sheet with VBA like a boss? If not, let me know and I’ll help you get what you need! And if you’d like more step-by-step, no-bullshit VBA guides delivered direct to your inbox, join my email newsletter below.
The Step 1 – Setup here takes place on line 9, where we store the “data” worksheet as wksData.
Lines 12-15 handles the Step 2 – Exploration on this challenge. First, on line 13, we identify the last-occupied row in column F (where our data column is stored), and on the next line we set rngData to store the block of data from the header (in row 5) to the last-occupied row.
Here’s where things get interesting! The Step 3 – Execution phase takes place from line 19 to line 32. Let’s walk through this nice and slow:
On line 19, we turn off Excel alerts (so the row deletion can occur without needing to click “OK” or “Yes” or whatever)
Lines 24-27 applies that Range.AutoFilter magic:
Field is the column you want to filter on relative to rngData (so we write 1 instead of 6)
Criteria1 and Criteria2 are exactly what they sound like
Operator is where we tell Excel that we want either “Thumbs.db” OR “Invoice.zip” (so we use xlOr)
Phew! We did a lot in those few lines, so let’s see what that looks like as the VBA is actually executing.
Range.AutoFilter In Slow Motion… Nice
Now that we have only the “Thumbs.db” and “Invoice.zip” rows visible in rngData, it’s time to delete them all in one swoop — and line 31 does exactly that. Again, since there is a lot happening in this one line, let’s review each piece:
Offset(1, 0) shifts rngData one row down, which saves the header (but grabs an extra row at the bottom of the Range)
Resize(.Rows.Count – 1) adjusts the last row of rngData up one (to get rid of the extra row from above)
SpecialCells(xlCellTypeVisible) gets only the visible cells from the newly-resized rngData
Rows.Delete deletes all of the visible rows
Damn yeah! Let’s look at how rngData is changing as the VBA is executing:
Each step in line 31, one at a time
Boom! The “Thumbs.db” and “Invoice.zip” rows have been deleted.
All that’s left is lines 36-44, which handles Step 4 – Cleanup. Lines 36-41 turns off the AutoFilter safely, and line 44 lets your user know that the rows have been removed.
So how does the Range.AutoFilter strategy compare to the For loop strategy?
Come on — you know the answer! Range.AutoFilter is fast as hell (an order of magnitude faster for that matter) and is easy to read too. If you want to see the two side-by-side, check out this 5-minute breakdown on a recent Stack Overflow question:
Are you using Range.AutoFilter to kill bad rows with VBA? If not, let me know and I’ll help you get what you need! And if you’d like more step-by-step, no-bullshit VBA guides delivered direct to your inbox, join my email newsletter below.
This is me when my For loop is deleting the WRONG rows
If you’ve been working with Excel and VBA for more than two seconds you have probably needed to delete rows that meet a certain criteria. It makes sense! Cleaning your data file by removing bad rows makes analysis and reporting a cinch.
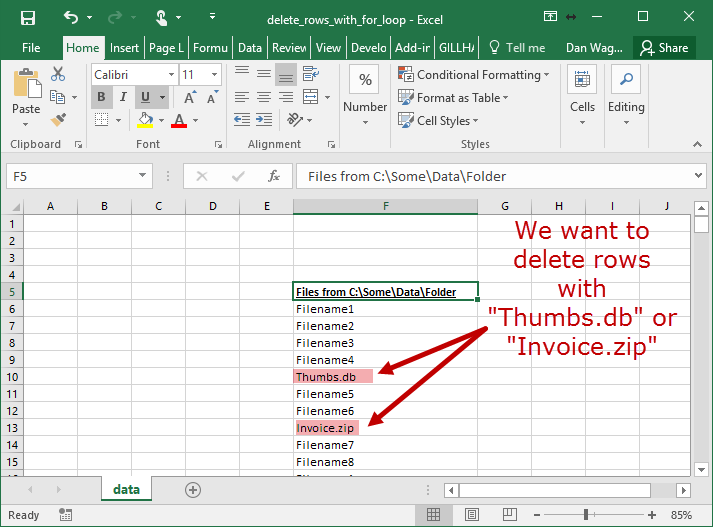
Let’s say you have a column that lists files in a certain folder, and you want to remove the “Thumbs.db” and “Invoice.zip” rows like this:
You need to delete “Thumbs.db” and “Invoice.zip” rows
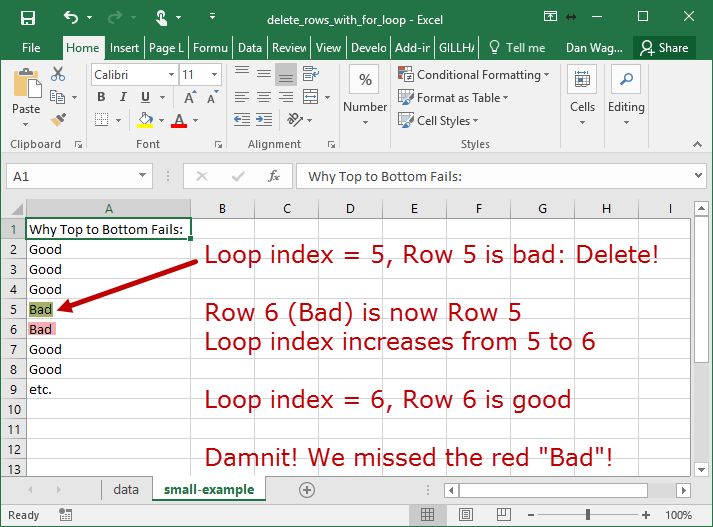
Easy cheesy, right? Just run a For loop from the top to the bottom, deleting rows as you go, right? Wrong.
If your loop runs from 6 to the last row deleting rows along the way, your For loop index will get out of sync with the row numbers in your sheet after the first deletion.
This is what happens when your For loop starts at the top and works down… you will probably miss bad rows!
Argh! Every time you delete a row, the index increases — which means you might miss a bad row.
The fix is to work backwards, with your For loop starting at the bottom and working up to the top:
Since this is a small example, the Step 1 – Setup phase is handled entirely by line 8. We create a Worksheet variable for the “data” sheet, which will come in handy down the line.
Step 2 – Exploration happens on line 12, where we identify the last-occupied row in column F. This sets our loop limit.
Lines 15-19 handles Step 3 – Execution. We start our For loop at the BOTTOM (i.e. lngLastRow) and iterate backwards to 6, which is where the data starts. Line 16 checks to see if the value in column F is “Invoice.zip” or “Thumbs.db”, and line 17 deletes the row if true.
Finally, we let our user know that the script has finished on line 23, which covers our Step 4 – Cleanup.
Phew! Not only are you deleting rows with a For loop like a champ, you now understand why looping from top to bottom will probably fail. You’re off to a great start!
Are you effortlessly killing bad rows with your VBA code? If not, let me know and I’ll help you get what you need! And if you’d like more step-by-step, no-bullshit VBA guides delivered direct to your inbox, join my email newsletter below.
This example uses the 64-bit version of 7-Zip, which is installed to the default location (C:\Program Files\7-Zip\7z.exe). No tricks up our sleeve there!
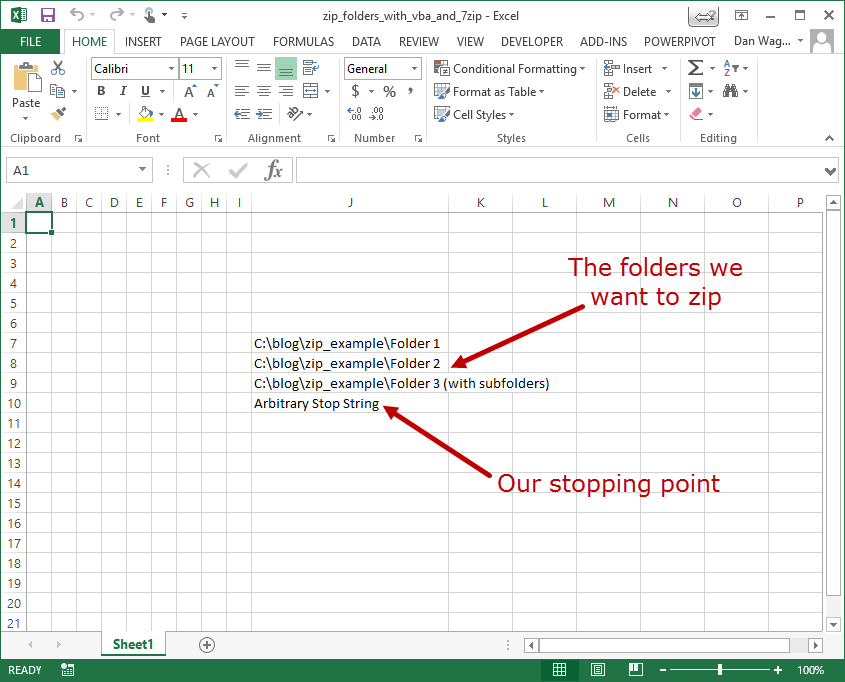
The list of folders to archive starts in J7, and we want the macro to stop when it comes to a certain string (“Arbitrary Stop String” in this example, haha) or row 50, whichever comes first. We want the zip files to end up in a different folder too: **C:\target-folder**.
Our Excel file with target folders and a stop point
We start with Step 1 – Setup, which takes place from line 13 to line 17.
blnEndFound is set to False, which will come in handy later as we loop through the folders
lngIdx, which is our counter, starts at 7 (because the folder info starts in row 7)
strTargetDir is assigned to the target folder where we want our zip files to end up
strEndFound is the string that will stop the loop
So far, so good — our setup is complete!
Step 2 – Exploration takes place inside the While…Wend loop on lines 23 through 36.
strFullPath gives us the full folder path from the sheet
lngIdx is a counter variable, which we increment by 1 each time
If the full folder path is NOT our stop string (strEndFound) and our counter is NOT 51 or greater, we have some zipping to do
On line 30, we assign strZipName with a function called GetZipFileName. It’s a custom function, so let’s review that code (which runs from line 56 to line 84).
In a nutshell, the purpose of this function is to return the name of the zip file. The way we will determine that name is by walking backwards from the end of the full folder path, stopping when we get to the “\” character. Once that position has been identified, we’ll take all the characters to the right of the “\” and add “.zip”. Easy cheesy!
str, on line 68, is always a single character, and by incrementing lng we walk backwards from the end of the input string (FullPath)
If str equals “\”, we know we have found what we need for our zip file name, and so we break the While…Wend loop by flipping blnCharIsASlash from False to True
Lines 75-79 are a guard against infinite looping, which can happen by mistake in a While…Wend loop (we set the arbitrary limit at 1000)
Finally, on line 82, we assign the output of the function to be all the characters to the right of the “\” with “.zip” appended to the end.
Phew! Now that we have the name of the zip file saved, let’s get back to the process of zipping!
Lines 33-36 wrap up the Step 2 – Exploration portion of our script, and all four of these lines revolve around creating the String that we will launch from the command line. This assignment looks pretty intimidating, but by going through it step-by-step you’ll see that it is not all that scary.
Chr(34) is the double quote character, which is essential for command line instructions. If there is a space character anywhere in a String that you’ll be running from the command line, you need to wrap the String in double quotes!
“C:\Program Files\7-Zip\7z.exe” is the 7-Zip executable file
” a -tzip “ tells 7-Zip to archive (“a” -> “archive”) in zip-format (“-tzip” -> “zip”)
strTargetDir is assigned on line 16 — it’s the place we want our zip file to end up
strZipName is assigned on line 30 — it’s the zip file name that we determined using the GetZipFileName function
strFullPath is assigned on line 23 — it’s the folder that was indicated in our spreadsheet
We add a “\” and “*” character to the end of the strFullPath folder to let 7-Zip know that we want to archive ALL files in the folder
Nice! If we were to Debug.Print our strCommand variable for the first run in this sheet, it would look like this:
“C:\Program Files\7-Zip\7z.exe” a -tzip “C:\target-folder\Folder 1.zip” “C:\blog\zip_example\Folder 1*”
With this String identified, all that’s left to do is execute.
Step 3 – Execution takes place from line 39 to line 45, and it all revolves around the WshShell object, which is stored as wsh in our script.
On line 39, we assign lngErrorCode (which will be a number) to the output of wsh.Run with three inputs:
strCommand is the full command line text that we created from lines 33-36
WindowStyle:=1 tells wsh to show the command window (If you want the window to be invisible, you would write WindowStyle:=0 instead)
WaitOnReturn:=1 tells wsh to halt the script until the command line finishes (If you don’t need your script to wait, you can instead write WaitOnReturn:=0)
If the command was successful, lngErrorCode will be 0 (zero). We check explicitly from line 42-45 for a successful run, and Exit Sub if something goes wrong.
Finally, Step 4 – Cleanup is an easy one-liner — we simply need to let the user know our script is done! On line 53, we use MsgBox to indicate that the macro has finished and that the Zip files were created.
Here’s the script in action:
Pat yourself on the back — you can now create Zip files from Excel with VBA and 7-Zip!
Are you zipping folders like a boss with your VBA code? If not, let me know and I’ll help you get what you need! And if you’d like more step-by-step, no-bullshit VBA guides delivered direct to your inbox, join my email newsletter below.