How do you extract several values from a string with VBA?
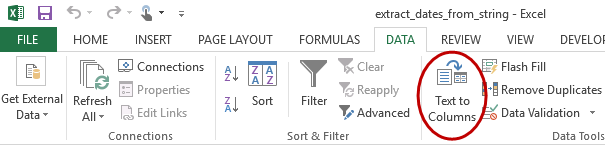
Pulling values out of a string is something you probably already do all the time with Excel’s handy “Text to Columns” built-in.
Excel’s built-in Text to Columns functionality
As amazing as “Text to Columns” is, though, sometimes the info you’re trying to get is just nestled too deeply, in too complicated a manner, for “Text to Columns” to work. What then?
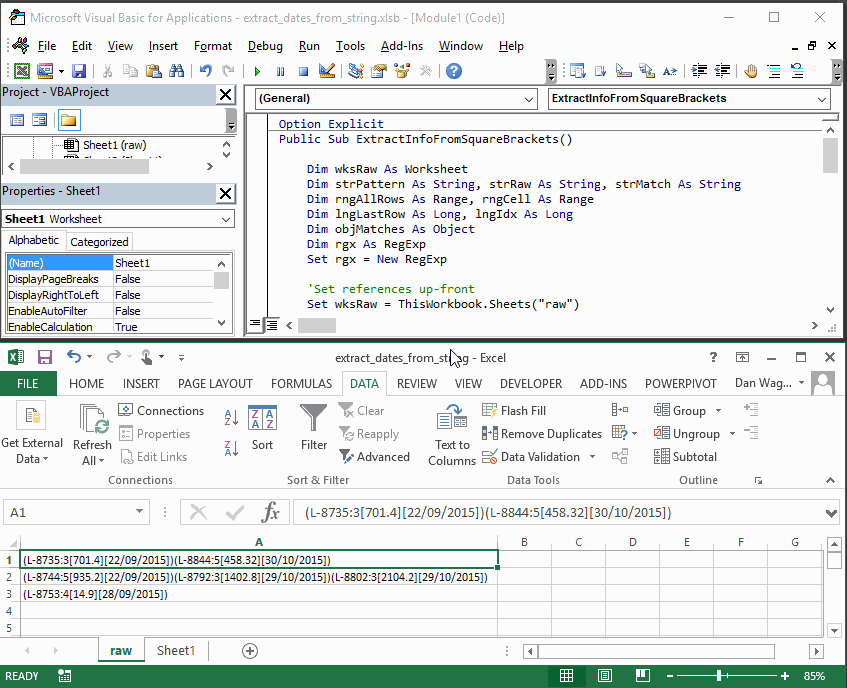
Let’s say you’re given some data that was spit out by someone in a different department’s arcane system, and it looks like this:
You want to take ALL values and dates contained by square brackets and move them to their own cells, so you have something like this:
Our End Goal
To pull this off we’re going to use Regular Expressions (regex or regexp for short) — but don’t worry, we’re going to break it down step-by-step and TOTALLY demystify the process.
Before we get to business, though, we need to first enable Regular Expressions in VBA.
Turn on Regular Expression support in VBA
From the VBA editor screen, select the “Tools” option, then click “References…”. In the next pop-up window, check the box next to “Microsoft VBScript Regular Expressions 5.5”, then click “OK” — that’s it! You now have access to the RegExp object.
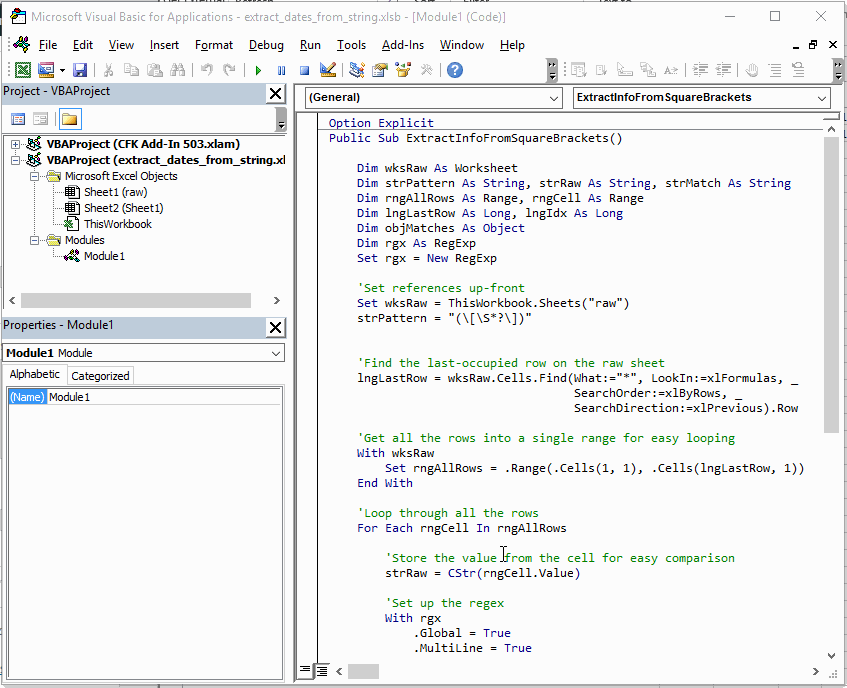
Lines 13-20 cover our Step 1 – Setup here — short and sweet. First, we set a reference to the worksheet (which is named “raw” in this case). Then, we set strPattern, which is the string-matching pattern our RegExp object will use, on the next line.
Let’s spend a little time on strPattern — there’s a lot packed into a little space.
FIRST THINGS FIRST THOUGH — don’t think that I dug into my memory and just conjured this sucker up. I use Rubular to iteratively build matchers, and you should too. By seeing the match results in real time, you can quickly build up what you need and move on.
With that out of the way, let’s talk about what’s contained in that strPattern variable:
The outer () parenthesis means you want numbered groups rather than one big blob of matches
The \[ (and the \] later) finds square brackets. That slash is called an “escape”, which is important here because square brackets have a special “range” meaning in Regular Expressions
The \S tells your RegExp to match any non-whitespace character
The * tells your RegExp to collect zero or more of the previous \S
The ? tells your RegExp to be non-greedy, and break each group when the ] is found
Phew! Let’s move on.
Finally, we create the actually RegExp object (called rgx in this example) on lines 15-20. The most important step in the RegExp object setup is on line 19, where we assign rgx.Pattern to be the strPattern we created above.
Lines 24-30 are our Step 2 – Exploration. We identify the last-occupied row, then create a Range object that contains all the cells we want to investigate… Easy cheesy!
Lines 33-59 handle our Step 3 – Execution, and that phase kicks off with a For Each...Next loop around the entire target Range.
The first thing we do in our loop is establish the raw string we’d like to match against. From there, we leverage the RegExp.Test method on our strRaw, which returns True if there are any matches and False otherwise.
If RegExp.Test returns True, then we create an object (called objMatches to hold all of our matches on line 42. Then, beginning on line 46, we loop through the objMatches object, removing square brackets from each value, and eventually writing the output to the neighboring columns (on line 50). Whaddup!
The Step 4 – Cleanup is a cinch in this script, as we only need to let the user know our macro has finished — and that’s exactly what happens on line 58.
And with that, we can now extract an arbitrary number of square bracket-enclosed values from a string. Nice!
Are you plucking values out of complicated strings with ease? If not, let me know and I’ll help you get what you need! And if you’d like more step-by-step, no-bullshit VBA guides delivered direct to your inbox, join my email newsletter below.
Deleting rows based on some criteria is something you will do all the time with VBA. Seriously — the scenarios are endless:
Delete rows where the cell value is blank Delete rows where the cell value is less than some number Delete rows where the cell value is less than a certain date Delete rows where the cell value is …
Being the sharp VBA writer you are, you already figured out that you have to loop backward too! (Author confession: the number of times I have incorrectly looped forward and watched my For...Next fail is embarrassingly high.)
Let’s say you are deleting rows based on blank cell values in a certain column:
DO NOT get hung up on the check against vbNullString (blank) in that example — you might be checking for values in a column below a number threshold (like 50):
You might even be trying to delete rows where the date in a column is more recent than a certain day (like Feb 1st, 2013):
Regardless of the specific cell context you are trying to delete, the For...Next loops above perform like shit! As your data files get bigger, your macro takes longer… and longer… and before long you’re waiting 15-20 minutes for all the cleanup. Let’s fix that by skipping the For...Next loop altogether!
If you had to tackle this task by hand, how would you go about it? With Excel’s built-in filter, right? With VBA we can do exactly that… and compared to looping, the Range.Autofilter method is ludicrous speed!
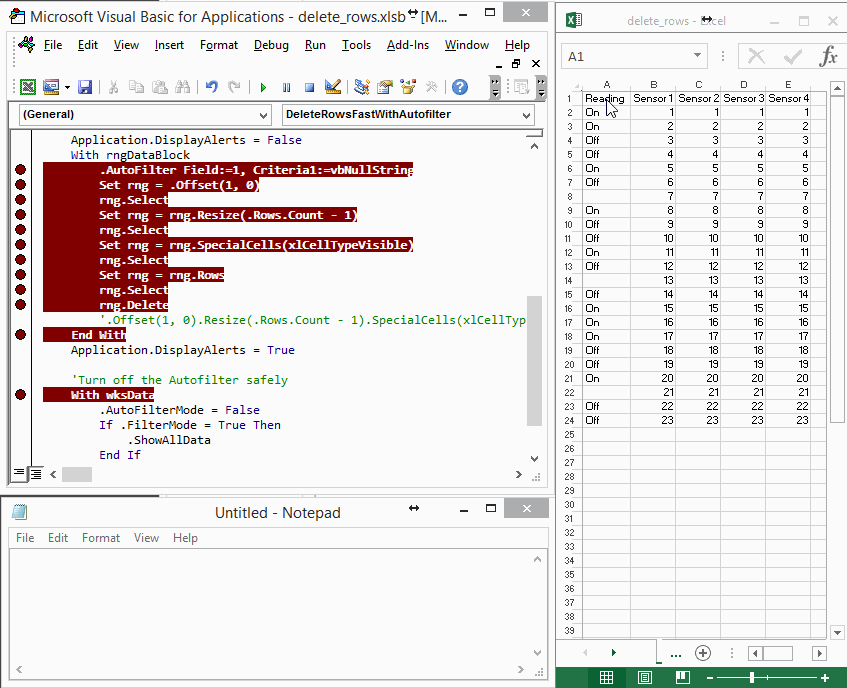
Lines 4-9 handle the Step 1 – Setup. The majority of the section is dimensioning variables, but on Line 9 we do a little up-front work and assign wksData to the Worksheet we will be modifying.
Lines 12-22 are the Step 2 – Exploration. First, we identify the last-occupied row and last-occupied column, using lngLastRow and lngLastCol to hold the values. Then, using that info, we create a Range variable called rngDataBlock to store the full block of data.
Lines 25-30 cover our Step 3 – Execution, and even though this section is short there is actually a TON of stuff going on, so let’s walk through it very slowly.
We use With rngDataBlock...End With to manage context here and shave a ton of extra typing off these statements. Every time you see a With Thing...End With, you know that the enclosed methods (like .AutoFilter in this case) are applied to Thing (which is rngDataBlock in our example).
On line 27, we’re using the .AutoFilter method with two inputs: Field and Criteria1. So what the heck are Field and Criteria1?
Field is the column number you’d like the filtering to happen on. In this case, we’re looking at column A, but it could just as easily be column B (Field:=2) or column Z (Field:=26).
Criteria1 is the filter logic applied to the column you specified in Field above. Here, we are looking for empty cells by checking if the cell equals vbNullString.
Line 28 does a lot of work, so the following .gif breaks it down step by step:
Deleting rows with the AutoFilter (step by step)
Here’s that breakdown again:
.Offset(1, 0): shift the Range down one row
.Resize(.Rows.Count - 1): adjust the Range to cover everything the original Range covered but short by one row (since we are saving our header row)
SpecialCells(xlCellTypeVisible): adjust the Range to only include cells that are visible, i.e. those that have NOT been filtered by the AutoFilter
.Rows: adjust the Range to cover the full rows from each of the visible cells
.Delete: delete the visible Range
Phew!
Finally, lines 33-38 handle our Step 4 – Cleanup, by turning off the AutoFilter safely. And that’s it!
Suppose you wanted to remove rows where the cell value was less than a numeric threshold, like 50? Easy peasy! just change the Criteria1 value on Line 27 like so:
Criteria1:="<50"
Or maybe you’re considering dates, and you only want to keep dates that are older than a certain day (like Feb 1st, 2013)? Another easy change to our friend Criteria1:
Criteria1:=">2/1/2013"
Now that you understand how to use Range.AutoFilter to delete rows rather than a loop, your macros will be WAY faster!
Is your delete-rows-based-on-column-criteria subroutine speedy as heck? If not, let me know and I’ll help you get what you need! And if you’d like more step-by-step, no-bullshit VBA guides delivered direct to your inbox, join my email newsletter below.
We’re almost there y’all! After wrapping Part 2, you now all the data in a single sheet. All that’s left to do is move all the processed CSVs to the “processed” folder (duh). Let’s get cracking!
Lines 4-9 are our straightforward Step 1 – Setup. Most important is line 9, where we use the Dir function — Dir does the heavy-lifting here.
The Dir function returns the first filename matching the pathname specified. We know that our macro-containing workbook is in the same folder as the CSVs, so we can use ThisWorkbook.Path combined with “*.csv” to catch the CSV files. (We also take advantage of the fact that Dir returns a zero-length String if there are no more matches in our While loop.)
Lines 15-18 handle our Step 2 – Exploration. We already know everything we need to in this particular case, so we simply assign filenames — nice! strDestinationFile is exactly the same as strSourceFile, except strDestinationFile has had the “processed” folder injected into the middle.
Step 3 – Execution is accomplished by lines 21-24. Moving files with VBA is a cinch by using the Name function, and on the next line we increment strFile by calling Dir again.
Finally, Step 4 – Cleanup is simply a notification to the user on line 28 that the script is finished.
Now that we’ve built everything out, our Public Sub ImportDataThenMoveFiles() script does it all!
Is this import-the-CSVs-then-move-the-CSVs suite of macros working for you? If not, let me know and I’ll help you get what you need! And if you’d like more step-by-step, no-bullshit VBA guides delivered direct to your inbox, join my email newsletter below.
Welcome back! Since Part 1, you have set up a handy folder structure and written your high-level, “ideal world” code. Let’s get to work on the ImportAllDataFiles subroutine!
Lines 4-23 handle the Step 1 – Setup. We’re mostly just dimensioning variables here, but lines 18-20 are a bit more interesting than that.
We first assign the master worksheet to a variable for easy access, then we identify the columns that will contain our “TimeZone” and “Date” data. Usually, this kind of up-front column assignment is not a good idea, but since we are in charge of the master sheet, we can assign these columns with confidence.
Boom — since we’re in charge of Master, we can be 100% sure about those tricky columns, “Time Zone” and “Date”
Finally, we use the Dir function on line 23 to feed our loop through the directory.
Since this subroutine relies on the interaction between the master sheet and each CSV, the Exploration and Execution steps bounce back and forth from line 26 through line 108, so let’s walk through each section and identify exactly what’s going on.
Lines 30-38 are doing some Exploration. We identify the last-occupied row on the master sheet (which will change every time a new block of data is appended from a CSV), and with the last row we assign a Range variable. rngDestination will make our copy / paste action much easier down the line.
Lines 41-56 should also be considered Exploration, this time focused on the CSV. We identify the data range (NOT including the headers, since we set that up already in our master file) then set it to another Range variable. rngSource now contains all the data we want to move from the CSV to the master sheet.
Line 60 is our super-simple Execution. The Range.Copy method makes moving data from one Range to another Range really easy — all we have to do is specify the Range to be copied and the destination!
Lines 63-82 begin our next round of Exploration, this time focused on getting that pesky “TimeZone” and “Date” data from the CSV:
The “Date” and “Time Zone” values only show up once, but we want them to run down the entire column in the master file
We want to write the “TimeZone” and “Date” data into columns at the far-right end of the original data block in the CSV, which will make pivoting the master sheet a breeze down the line.
First, on line 73 and line 79, we do some more Step 2 – Exploration and establish Range variables representing the space on the sheet that we want to fill with the “Time Zone” and “Date” info, then on lines 86-87 we create Variant arrays to match (varTimeZoneCol and varDateCol).
Next, we continue our Exploration get the actual “Time Zone” and “Date” values from the CSV on lines 90-91.
Don’t let the Step 3 – Execution lines (94-97) confuse you — we are simply making EVERY element of the Variant arrays equal to the “Time Zone” or “Date” value. I wish there was a better way to do this, but as far as I know there isn’t — argh!
The final Execution step happens on lines 100-101, where we write the Variant arrays back to the Range columns for “Time Zone” and “Date”.
With that, the CSV data has been completely extracted!
Finally, lines 106-107 close the CSV and adjust the target of Dir, which is Step 4 – Cleanup in preparation for the next CSV file.
Lines 111-112 handle the final Cleanup, where the user is alerted that the data has been merged in and the master has been saved.
Pat yourself on the back, because you just wrapped up Part 2!
Ready for the finale? Check out Part 3, where we move the CSVs that have had their data extracted into a different folder.
Is your merge-many-files-into-one subroutine humming along nicely? If not, let me know and I’ll help you get what you need! And if you’d like more step-by-step, no-bullshit VBA guides delivered direct to your inbox, join my email newsletter below.
This situation or some slight variation has undoubtedly landed on your desk before. You’re given a bunch of CSVs (or XLSXs, or text files maybe), and you need to get all that data into a single “master” file. Bonus points if you get new data files daily!
Fortunately, with VBA you have everything you need to make short work of this challenge.
In Part 1, we’ll handle the folder setup and decide on our overall design. This post will be short, but DAMN important — spending a bit of time up-front allows us to see the potential pitfalls from the beginning, when we can actually DO something about them.
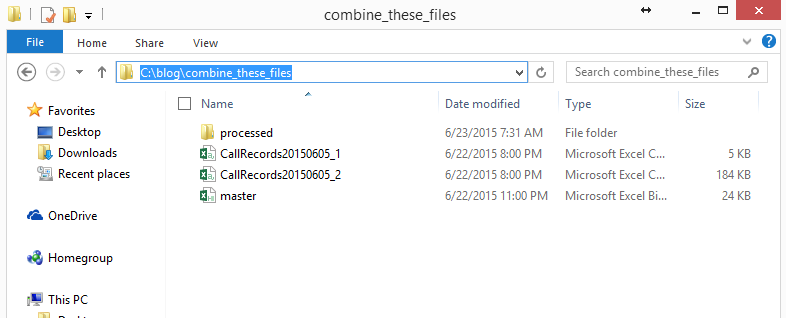
First things first. We know that we want to import each CSV one time, so it would make sense to move each imported file to some kind of “processed” (or “completed”) folder once it’s done.
When taking on bigger projects, it can be really helpful to write out the “ideal world” code first to serve as a guideline. In this case, our “ideal world” code would look like this:
This is the setup we’ll use to combine all these suckers
And with that, we’re done with Part 1!
Ready to dive-in and do some heavy-lifting? Check out Part 2, where we extract data from each CSV and add it to our master sheet.
Does this high-level strategy and setup make sense to you? If not, let me know and I’ll help you get what you need! And if you’d like more step-by-step, no-bullshit VBA guides delivered direct to your inbox, join my email newsletter below.