
How to Select a Cell in One Column and Highlight the Corresponding Cell in Another Column
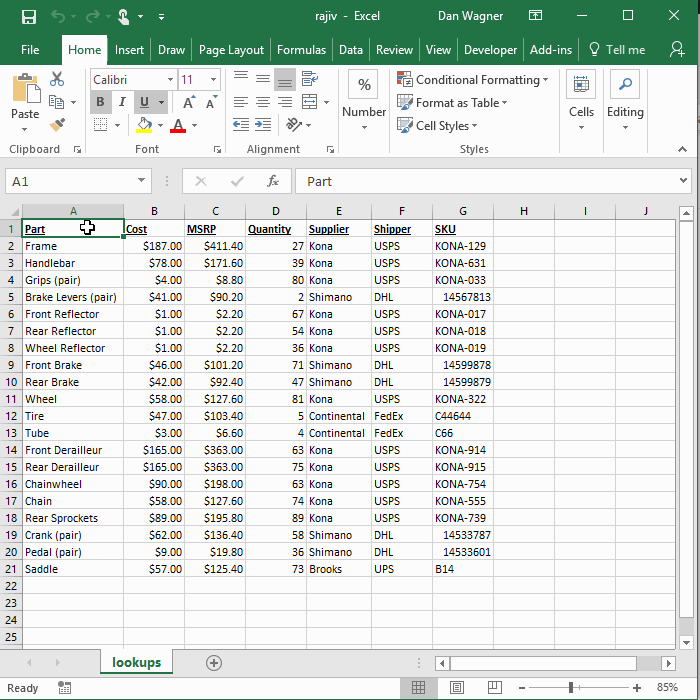
Click a part in Column A, highlight the SKU in Column G
You might have read the tutorial on how to click one cell and highlight another, which covers situations where you have a well-defined group of cells to operate in.
What happens when the user might click in ANY cell in the column though?
For example:
- Selecting A1 will highlight G1
- Selecting A2 will highlight G2
- Selecting A3 will highlight G3
- etc. etc.
- Selecting Ax will highlight Gx
Great question!
We will use the Sheet-specific Worksheet_SelectionChange event again, like we did in the original tutorial, but this time we will be taking advantage of the Range.Column and Range.Row properties.
Without further ado:
Let’s break it down step-by-step using the 4-step VBA process as our guide:
Step 1 – Setup
Step 2 – Exploration
Step 3 – Execution
Step 4 – Cleanup
In this situation, most of the Step 1 – Setup work is actually handled by the Worksheet_SelectionChange subroutine itself, as it passes in the selected Range (Target) for us. However, there are a couple things we need to tackle.
First, on line 9, we assign wksLookups to be the Worksheet everything is taking place on by taking advantage of the Range.Parent method.
Then, on line 12, we set the background color to ALL of column G to be the default “clear” (i.e. None). You might be asking yourself at this moment, “But why?”

Why are we doing this?
Another great question!
This line is a must to make sure we reset (or “initialize”) the highlight column, which is G in this case, back to a default state before applying the background change later on. If we did not initialize here, cells would remain highlighted even after the selection changed!
And with that, our Step 1 – Setup is complete. Let’s keep it moving y’all…
Step 2 – Exploration takes place on lines 17-22.
First, on line 17, we use an If statement to check two things:
- Is Target in column A (i.e. column 1)?
- Is the first row of Target 2 or greater?
This is because we are only interested in selections in column A, and because in this example row 1 is a header row.
(If you want row 1 to work like all the other rows, you can simply get rid of the And Target.Row > 1 portion of the If statement here.)
Next, we determine the first and last rows contained in Target on lines 21-22.
The first row is easy — we can simply call Target.Row to get the first row.
The last row, though, requires a bit more work. The built-in Range.Rows.Count method will give us the number of rows inside Target, but that number is relative and specific to wherever Target is. In this case, we need the absolute final row number.
To make sure we get the absolute final row number, we add the total number of rows in the Target Range to the first row number minus one like this:
Target.Rows.Count + (Target.Row – 1)
Nice!
That wraps up our Step 2 – Exploration, which means we’re ready to move on.
Step 3 – Execution is where the actual cell highlighting takes place, with lines 25-28 getting the job done.
First, on line 25, we use a context manager (With wksLookups) to make sure we don’t have to type the Worksheet variable a bunch of times.
Inside the With statement, on lines 26 and 27, we define the Range we want to highlight and set its background color to yellow.
Let’s review that piece-by-piece:
.Range(.Cells(lngFirstRow, 7), _
.Cells(lngLastRow, 7))
This defines the Range that we will be highlighting.
Back on lines 21 and 22, we defined lngFirstRow and lngLastRow by taking advantage of some built-in methods on Target.
We know that column G (or column 7 if we’re talking numbers) is where we want to apply highlighting, so that is our column number in both of the .Cells(RowNumber, ColumnNumber) calls.
Next up, the actual background property:
.Interior.Color
When working with a Range variable, you can change the background color by using Range.Interior.Color = whatever.
And that whatever value here? Well, we are going to use the built-in RGB (Red Green Blue) function to make the color yellow with:
RGB(255, 255, 0)
And that’s it!
In this situation there is no Step 4 – Cleanup to be done, so we are finished!
Want to see this code in action? Here’s an 5-minute video guide:
Got your highlighting tool up-and-running like a boss? If not, let me know and I’ll help you get what you need! And if you’d like more step-by-step, no-bullshit VBA guides delivered direct to your inbox, join my email newsletter below.