
How to Click One Cell and Highlight Another

This is my Advent calendar
When you’re using Excel to track activities on a calendar, it can be incredibly helpful to highlight sections of the grid based on the cell you selected. If you need Excel to do something based on a selection, you should reach for the Worksheet_SelectionChange event.
Suppose your calendar looks like this, and you know that you can only go biking on Mondays, swimming on Tuesdays, and rowing on Wednesdays. Scheduling those activities would be easy cheesy with a visual aid in the form of changed background colors:
Using Worksheet_SelectionChange makes this a snap
So how does it all work? This short script is all you need:
Let’s walk it down using the 4-Step VBA Process to guide us along the way:
Step 1 – Setup
Step 2 – Exploration
Step 3 – Execution
Step 4 – Cleanup
One CRITICAL note before we get into the details. In contrast to your typical VBA subroutine, we’re using an Event that’s tied to a Worksheet. (In this case, the Worksheet is “calendar”, but it could be any Worksheet.)
When you are taking advantage of Events, your code will go into the appropriate Worksheet (or Workbook) rather than a regular module!
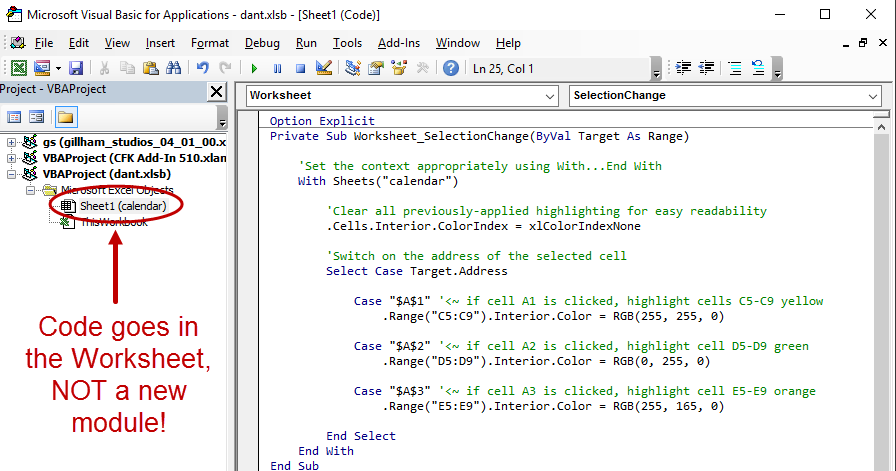
This Event is tied to calendar, so the code belongs in the calendar Worksheet module
Step 1 – Setup takes place on lines 5 through 8. First, on line 5, we set up a context manager using With…End With, since we want to operate on the calendar Worksheet. Then, on line 8, we remove all cell highlighting from the calendar Worksheet to ensure a clean slate before moving on to the next steps.
Step 2 – Exploration is contained entirely within the Select Case statement that starts on line 11. Target is the Range passed in to Worksheet_SelectionChange and represents the cell our user clicked on, so we do our Select Case checking on Target.Address.
Line 13 checks to see if cell A1 was selected, line 16 checks to see if cell A2 was selected, and line 19 checks to see if cell A3 was selected. The Select Case statement is perfect for this situation since we need to check lots of potential cases and do not want to constantly be writing “If Then ElseIf Then ElseIf Then ElseIf Then …”
Step 3 – Execution happens inside each of the case options within the Select Case statement. Line 14 highlights cells C5:C9 yellow if cell A1 was selected, line 17 highlights cells D5:D9 green if cell A2 was selected, and line 20 highlights cells E5:E9 if cell A3 was selected.
Phew — with that, you’re done!
Here’s a 6 minute overview of the code including a demo of each activity for all the visual learners out there:
Are you highlighting destination columns in a way that will delight your users? If not, let me know and I’ll help you get what you need! And if you’d like more step-by-step, no-bullshit VBA guides delivered direct to your inbox, join my email newsletter below.