How to Combine Data with Different Columns on Multiple Sheets into a Single Sheet
How do I fill-in a new sheet with data from sheets 2, 3, 4 … when those sheets have different columns (or are in different order)?
Combining data from many sheets into a single sheet? Love it.
It’s something you’ll do all the time, and you can check out tutorials on how to accomplish this task when all the sheets have the same column order as well as when you need to skip certain sheets but combine others.
But what about when you have different columns on each sheet? Or when the columns share similarities, but are in different order?
It’s a pain in the ass, but by using a Scripting.Dictionary to track column names (as Keys) and numbers (as Items) you can ensure that your data lines up appropriately for an easy pivot table.
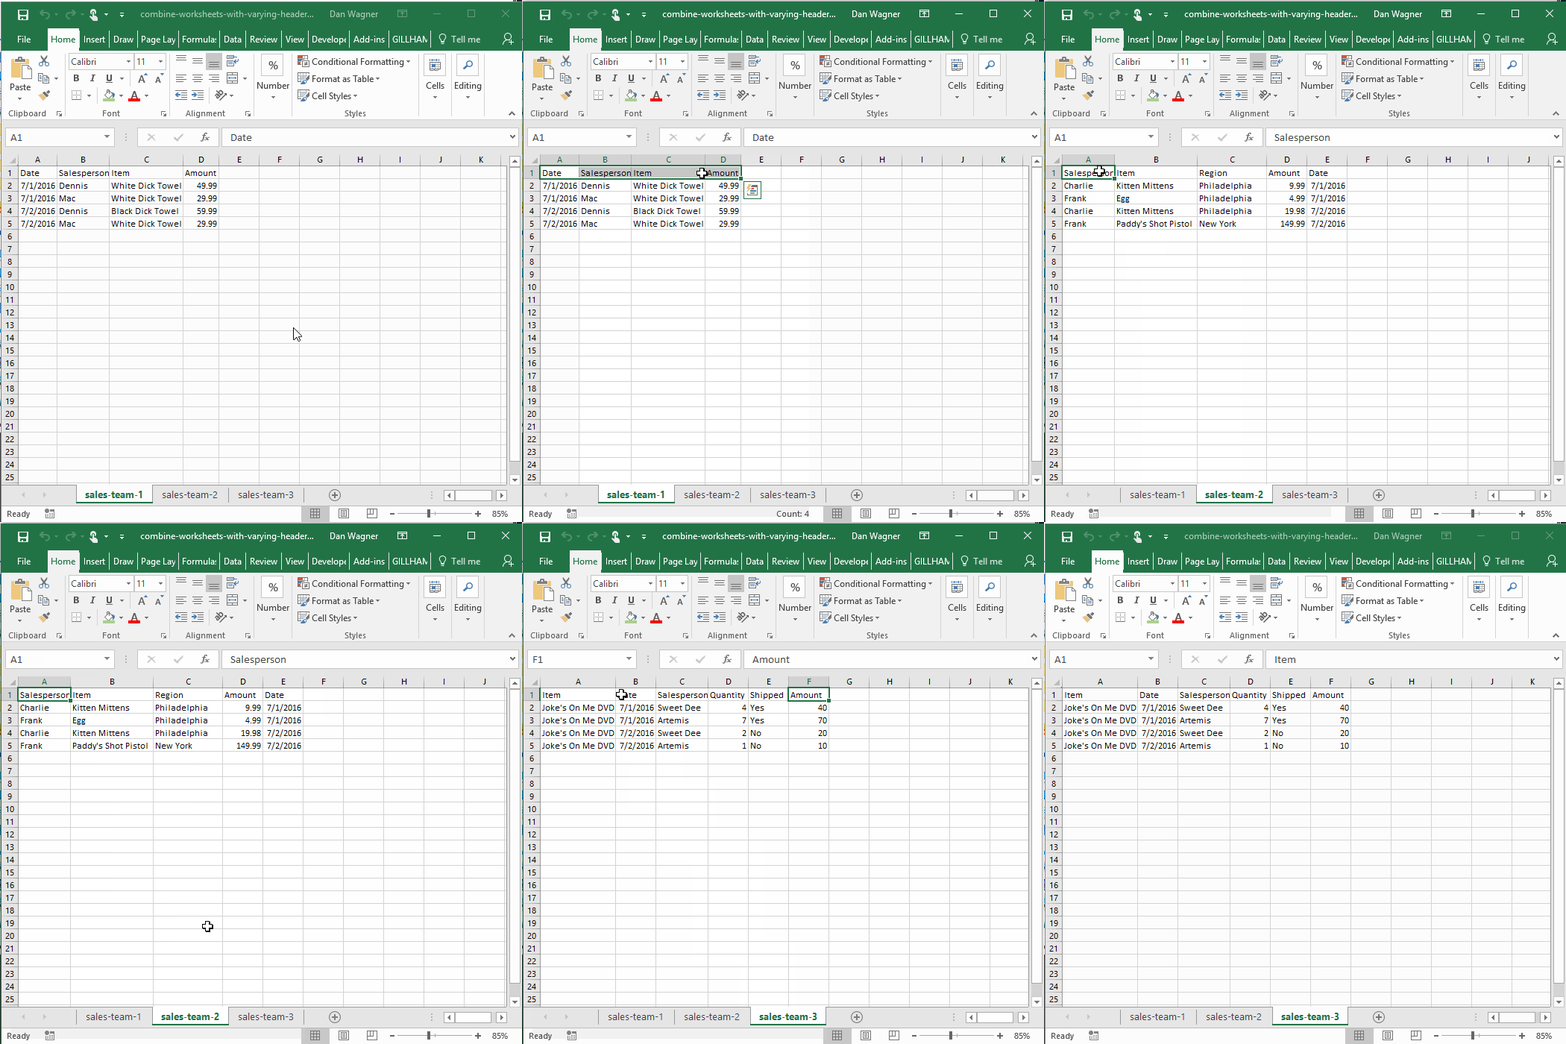
Let’s check out an example, featuring my favorite sales teams of all time: Dennis, Mac, Frank, Charlie, Sweet Dee, and Artemis from It’s Always Sunny in Philadelphia. You’ll notice that the sheets have some columns in order, some shared columns, and some NON-shared (i.e. totally different) columns:
Cool!
Before we go any further, you will need to make sure you have the Microsoft Scripting Runtime added to this project (if you have not already).
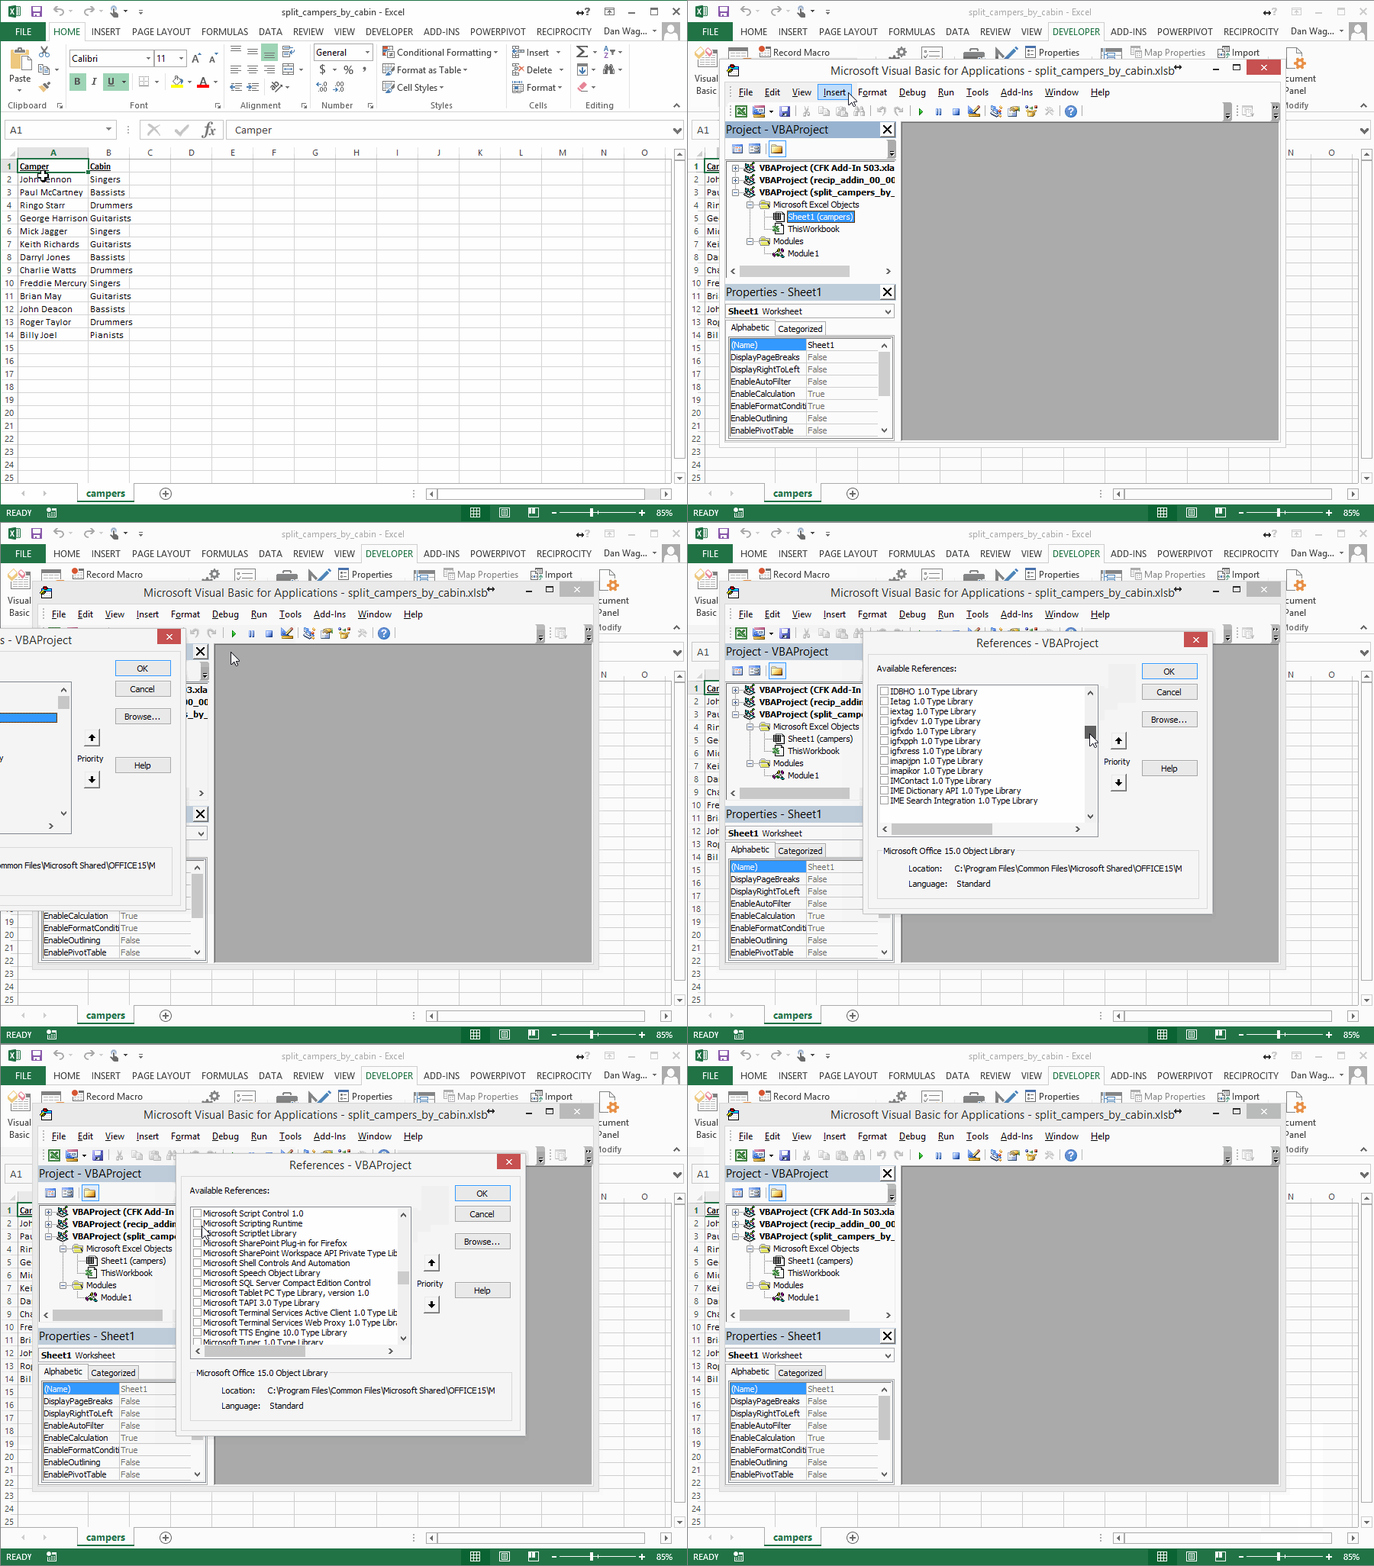
This 13-second gif walks you through the steps, but in case it is not working here is a quick step-by-step guide:
- Open the VBA Editor window
- Click “Tools” from the File menu
- Select “References” from within the Tools menu
- Scroll down until you find “Microsoft Scripting Runtime”
- Check the box next to the “Microsoft Scripting Runtime”
- Click OK
Phew! Now we can get back to the task at hand… combining data!
Here’s the scoop y’all — our It’s Always Sunny sales data can be combined with this macro:
Let’s review the code using the 4-step VBA process as our guide:
Step 1 – Setup
Step 2 – Exploration
Step 3 – Execution
Step 4 – Cleanup
Step 1 – Setup is a cinch, and we knock it all out on lines 14-18. We:
- (line 15) Make sure the Scripting.Dictionary is set to vbTextCompare, which means the Keys will be case-INsensitive
- (line 16) Assign lngFinalHeadersCounter to 1, since we do not have any column headers… yet
- (line 17) Assign lngFinalHeadersSize to the .Count of dicFinalHeaders, because we will need to know when new columns are added (and will use this variable for comparisons)
- (line 18) Create a new Worksheet and set it to wksDst — this will be our Destination Worksheet, where all of the data will be combined
Smooth! With our set up out of the way, we’ll accomplish Step 2 – Exploration and Step 3 – Execution in two phases:
- Phase 1: assemble the final headers Scripting.Dictionary and prepare the Destination Worksheet
- Phase 2: copy each column from each Worksheet to the appropriate place on our Destination Worksheet
Let’s dive into Phase 1!
The Step 2 – Exploration of Phase 1 takes place between lines 26-40.
First, we start looping through all of the Worksheets in ThisWorkbook on line 26, ignoring the Destination Worksheet (wksDst) on line 29.
Once we are sure we are NOT on the Destination Worksheet, we identify the last-occupied column on line 35 using LastOccupiedColNum from the VBA Toolbelt. You’re using the VBA Toolbelt, right? Please download it, use it as your new project template, and save yourself TONS of repetitive coding…
But let’s move on, as our Step 2 – Exploration for Phase 1 is done!
Line 36 kicks off a For…Next loop through this Worksheet’s occupied-columns, which is where our Step 3 – Execution takes place for Phase 1. Inside this loop, we will repeat the next 4 steps for each column header:
- (line 40) Assign strColHeader to be the leading-and-trailing-spaces-removed column header name
- (line 41) Check dicFinalHeaders to see if it already contains this column name (i.e. strColHeader)
- (lines 42-43) If that column name is NOT in the Scripting.Dictionary from step #2 above, add it as the Key, with lngFinalHeadersCounter, representing the target column number, added as the Item
- (line 44) Increment the lngFinalHeadersCounter variable so the next new column header name points to the next column number
Since we are inside the For Each wksSrc In ThisWorkbook.Worksheets loop, those steps are repeated for each Worksheet as well!
The last bit of Step 3 – Execution for Phase 1 happens on lines 58-60, which is where we set up the Destination Worksheet with the header column names we just collected.
Line 58 starts by kicking off a For Each loop to iterate through each Key in dicFinalHeaders.
Finally, on line 59, we write each header column name to its appropriate column number on wksDst, our Destination Worksheet — a cinch, since dicFinalheaders(varColHeader) gives us the column number.
Boom! That wraps up Phase 1 and sets us up for an easy Phase 2 — take a moment to celebrate and enjoy this gif of Charlie shooting a gun.
The Step 2 – Exploration in Phase 2 takes place between lines 71-85.
Much like Phase 1, we use a For Each loop on line 71 to iterate through each Worksheet, and on line 74 we make sure that the final Destination Worksheet is skipped.
So far, so good!
On lines 80 through 85, we assign three variables to make our copy / paste (which is the next step in Phase 2, Execution) work smoothly:
- (line 80) lngLastSrcRowNum is the last-occupied row on the Source Worksheet, which is where we will copy data FROM
- (line 81) lngLastSrcColNum is the last-occupied column on the Source Worksheet, which determines the bounds of our (eventual) loop through all of the data columns
- (line 85) lngLastDstRowNum is the last-occupied row on the Destination Worksheet, which is where we will paste data TO
That wraps Step 2 – Exploration for Phase 2, which means it’s time to jump into Step 3 – Execution!
Line 90 kicks off a For loop through each of the columns on our Source Worksheet. (Remember, we repeat this for each Worksheet that is not the final Destination Worksheet, just like in Phase 1.)
Line 91 assigns strColHeader, the name of this particular column header. (We will use this name in the next step, to get the right destination column number from dicFinalHeaders.)
Lines 95-96 set rngDst, the cell target on our final Destination Worksheet, using two things:
- lngLastDstRowNum + 1, since we want to send our data one row below the last-occupied row on the Destination Worksheet
- **dicFinalHeaders(strColHeader), which as you know will return the appropriate column number
Easy peasy!
Lines 97-98 set rngSrc, the column of data from our Source Worksheet. Since we know the column number (lngIdx, as we’re looping through the columns) as well as the last-occupied row on the Source Worksheet (lngLastSrcRowNum), we can create this Range using these cells.
And finally, the copy / paste happens on line 104, where we call the Copy method on rngSrc with a Destination parameter of rngDst.
And with that, you’re done! Time to celebrate y’all, as you have solved a seriously challenging problem in a VERY flexible way.
The last little bit of this script is our Step 4 – Cleanup, which takes place on line 115. All we’re doing here is throwing a MsgBox to the user, letting him or her know that the data has been combined. Wahoo!
Want to see this code in action? Here’s a 12-minute guide to the script, most of which is spent illustrating exactly how each column of data gets lined up appropriately on the Destination Worksheet:
Are you combining multiple Sheets with out-of-order (or completely different) columns into a single Sheet like a pro? If not, let me know and I’ll help you get what you need! And if you’d like more step-by-step, no-bullshit VBA guides delivered direct to your inbox, join my email newsletter below.


