How To Speed Up Delete Row Loops
How do you speed up a loop that deletes rows?
Deleting rows based on some criteria is something you will do all the time with VBA. Seriously — the scenarios are endless:
Delete rows where the cell value is blank
Delete rows where the cell value is less than some number
Delete rows where the cell value is less than a certain date
Delete rows where the cell value is …
Being the sharp VBA writer you are, you already figured out that you have to loop backward too! (Author confession: the number of times I have incorrectly looped forward and watched my For...Next fail is embarrassingly high.)
Let’s say you are deleting rows based on blank cell values in a certain column:
DO NOT get hung up on the check against vbNullString (blank) in that example — you might be checking for values in a column below a number threshold (like 50):
You might even be trying to delete rows where the date in a column is more recent than a certain day (like Feb 1st, 2013):
Regardless of the specific cell context you are trying to delete, the For...Next loops above perform like shit! As your data files get bigger, your macro takes longer… and longer… and before long you’re waiting 15-20 minutes for all the cleanup. Let’s fix that by skipping the For...Next loop altogether!
If you had to tackle this task by hand, how would you go about it? With Excel’s built-in filter, right? With VBA we can do exactly that… and compared to looping, the Range.Autofilter method is ludicrous speed!
Let’s see how it’s done:
More lines of code? Absolutely — no debate there. But a huge performance improvement? You bet.
Let’s walk down the code above in the context of the 4-step VBA process:
Step 1 – Setup
Step 2 – Exploration
Step 3 – Execution
Step 4 – Cleanup
Lines 4-9 handle the Step 1 – Setup. The majority of the section is dimensioning variables, but on Line 9 we do a little up-front work and assign wksData to the Worksheet we will be modifying.
Lines 12-22 are the Step 2 – Exploration. First, we identify the last-occupied row and last-occupied column, using lngLastRow and lngLastCol to hold the values. Then, using that info, we create a Range variable called rngDataBlock to store the full block of data.
Lines 25-30 cover our Step 3 – Execution, and even though this section is short there is actually a TON of stuff going on, so let’s walk through it very slowly.
We use With rngDataBlock...End With to manage context here and shave a ton of extra typing off these statements. Every time you see a With Thing...End With, you know that the enclosed methods (like .AutoFilter in this case) are applied to Thing (which is rngDataBlock in our example).
On line 27, we’re using the .AutoFilter method with two inputs: Field and Criteria1. So what the heck are Field and Criteria1?
Fieldis the column number you’d like the filtering to happen on. In this case, we’re looking at column A, but it could just as easily be column B (Field:=2) or column Z (Field:=26).Criteria1is the filter logic applied to the column you specified inFieldabove. Here, we are looking for empty cells by checking if the cell equalsvbNullString.
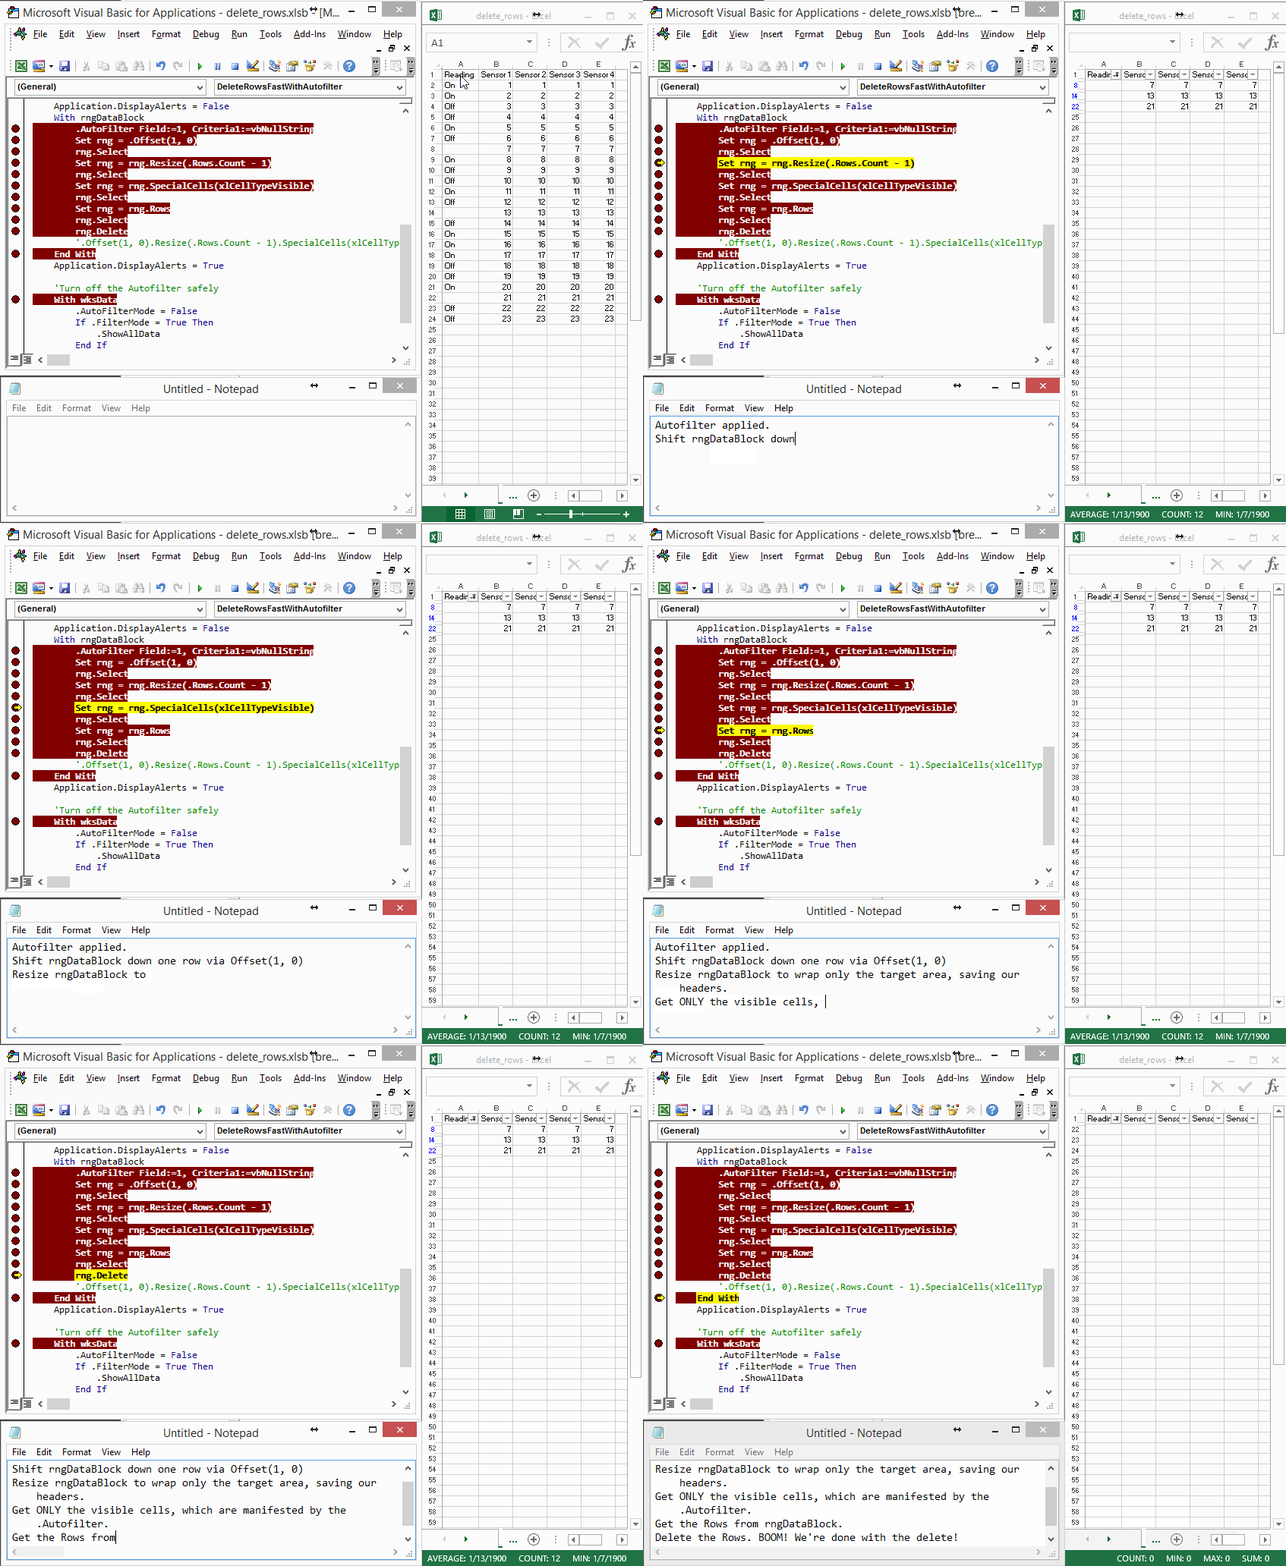
Line 28 does a lot of work, so the following .gif breaks it down step by step:
Here’s that breakdown again:
.Offset(1, 0): shift theRangedown one row.Resize(.Rows.Count - 1): adjust theRangeto cover everything the originalRangecovered but short by one row (since we are saving our header row)SpecialCells(xlCellTypeVisible): adjust theRangeto only include cells that are visible, i.e. those that have NOT been filtered by theAutoFilter.Rows: adjust theRangeto cover the full rows from each of the visible cells.Delete: delete the visibleRange
Phew!
Finally, lines 33-38 handle our Step 4 – Cleanup, by turning off the AutoFilter safely. And that’s it!
Suppose you wanted to remove rows where the cell value was less than a numeric threshold, like 50? Easy peasy! just change the Criteria1 value on Line 27 like so:
Criteria1:="<50"
Or maybe you’re considering dates, and you only want to keep dates that are older than a certain day (like Feb 1st, 2013)? Another easy change to our friend Criteria1:
Criteria1:=">2/1/2013"
Now that you understand how to use Range.AutoFilter to delete rows rather than a loop, your macros will be WAY faster!


