
How to Insert New Rows Based on Values

Insert rows without ball-ache by following the steps below
Actually inserting rows with VBA is easy enough, but getting the logic right, ESPECIALLY inside a loop, can be a pain in the dick!
This is because the default loop behavior is to start at the top (small row numbers) and end at the bottom (big row numbers). When adding rows, however, each addition changes the underlying row indices on the Worksheet!
Unless you have accounted for that change (you haven’t, by the way), the logic inside your loop is going to act on the wrong rows after the first new row is inserted… and that’s a recipe for disaster.
The solution? Work “backwards”, from the bottom to the top.
Let’s check out an example.
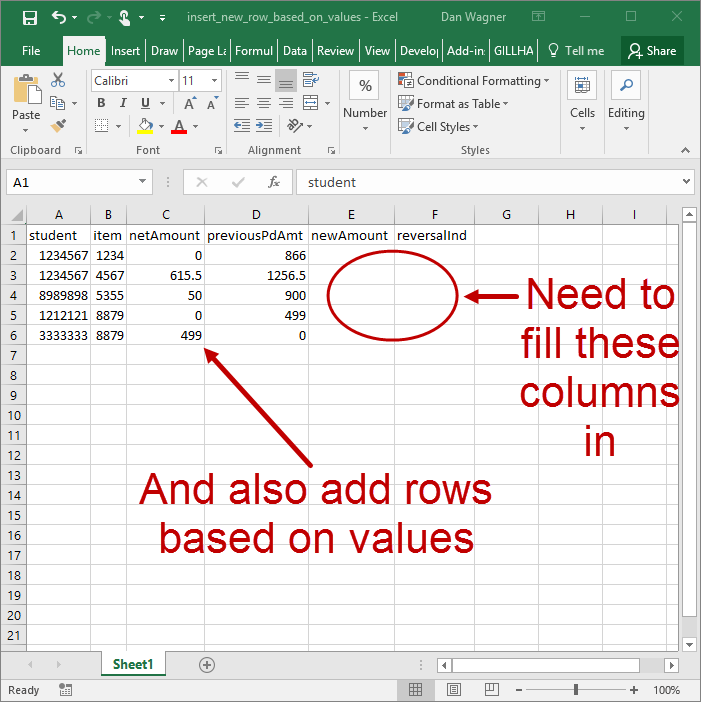
This is the sheet we start with
Suppose that we need to fill-in the newAmount and reveralInd columns, and we also need to add rows based on the value of netAmount.
Here are our rules:
- newAmount should always be set to the same value as previousPdAmt
- reversalInd should always be set to “Y” with one exception (#7 below)
- If netAmount is greater than zero, we need to add a row immediately below the greater than zero occurrence
- In the newly-added row, the student should be the same as the above
- In the newly-added row, the item should be the same as the row above
- In the newly-added row, the newAmount should be set to the netAmount from the row above
- In the newly-added row, the reversalInd should be set to “N” (this is the one exception we mentioned in item #2)
Sounds like a lot, but by following the “go backwards, from bottom to top” strategy we’ll make short work of this job.
Let’s review the code:
Dust that trusty 4-step VBA process off, since we’re going to use it here:
Step 1 – Setup
Step 2 – Exploration
Step 3 – Execution
Step 4 – Cleanup
In this case, Step 1 – Setup and Step 2 – Exploration are essentially the same thing (since we already know the column numbers). These steps take place on lines 13 to 21.
Lines 14-19 handle the column numbers for each field, from student all the way to reversalInd.
Line 20 is where we assign the Worksheet containing all our data. And finally, line 21 is where we identify the last-occupied row on the data Worksheet using the super-handy LastOccupiedRowNum from the VBA Toolbelt. You ARE using the VBA Toolbelt, right? If not, take 7 seconds and get it here.
That’s it! With Step 1 – Setup and Step 2 – Exploration out of the way, we jump into Step 3 – Execution.
This takes place between lines 23-69, which we’ll split into two phases:
- (Phase 1) apply logic from above AND identify rows where we’ll need to insert a new row
- (Phase 2) insert new rows per Phase 1 and apply the rest of the logic from above
Sound like a plan? Cool — let’s get after it then.
Phase 1 of Step 3 – Execution is the For loop that takes place on lines 26-41. Note the structure of this For loop — we start at the last row (lngLastRow) and work BACKWARDS to 2, decreasing the counter (lngIdx) by 1 each time!
Based on the logic from above, lines 31-32 handle the first two rules:
- (line 31) newAmount should always be set to the same value as previousPdAmt
- (line 32) reversalInd should always be set to “Y” with one exception
Lines 37-39 use a Collection to identify any row where the netAmount is greater than zero. We do this to accomplish the goal set out in rule #3:
- If netAmount is greater than zero, we need to add a row immediately below the greater than zero occurrence
Again, since we are working backwards (from the bottom to the top), it’s important to know the row numbers will be stored in this Collection from largest to smallest! This strategy will come in handy in Phase 2, which occurs below.
Phase 2 of Step 3 – Execution is the For Each loop on lines 51-67.
First, though, a short note on the actual structure of this loop. In general, I prefer “For Each” loops over “For” loops — by picking a good iterator variable name, “For Each” loops practically read like perfect English! Code that reads like English is easy for your coworkers to understand, which means the code will also be easy to maintain.
Since collections in VBA can be iterated through using For Each (with a Variant-type iterator), that is the strategy we’ll be using here.
Since each item in the Collection is a row number where a new row must be inserted (sorted from largest to smallest), our first task is to insert those new rows! This occurs on line 54.
Lines 57-58 accomplish rules #4 and #5:
- In the newly-added row, the student should be the same as the above
- In the newly-added row, the item should be the same as the row above
Since we know varRowNum is the row immediately preceding the just-inserted row, we can access the just-accessed row number with varRowNum + 1. This is exactly how we’ll work on this new row for every applicable rule!
Speaking of rules, we accomplish rule #6 with line 62:
- In the newly-added row, the newAmount should be set to the netAmount from the row above
And finally, we follow rule #7 on line 65:
- In the newly-added row, the reversalInd should be set to “N” (this is the one exception we mentioned in item #2)
That’s it for Step 3 – Execution!
There is not much to clean up here, so Step 4 – Clean Up is simply an alert to the user (on line 72) letting him or her know that we’re done. Sweet!
By working backwards, from bottom to top, we can insert rows without any complicated row-number-shifting techniques… and when it comes to VBA code, simple is good.
More of a visual learner? No worries! Here’s a quick 7 minute run-through of this technique on the code on YouTube:
Inserting rows based on values with the precision of a Jean-Claude Van Damme Bloodsport kick? If not, let me know and I’ll help you get what you need! And if you’d like more step-by-step, no-bullshit VBA guides delivered direct to your inbox, join my email newsletter below.